


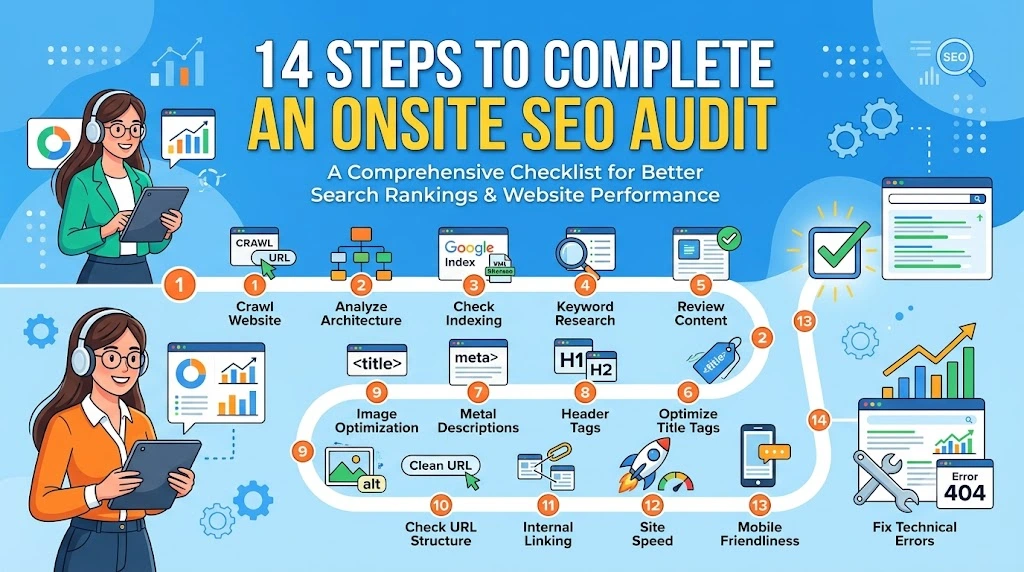
There are many steps to complete an on-site check of your website that affect how well it ranks on Google. This guide walks through all 14 in plain language, with no technical background needed, which are:
- Crawling/technical errors
- Content pruning
- Robots.txt/meta robots
- Page speed
- Mobile-friendliness
- Core Web Vitals
- Structured data
- Title tags/meta descriptions
- Keyword/traffic analysis
- Competitor analysis
- On-page content quality
- Internal linking
- Reformat URL/redirect structure
- Results tracking
An SEO audit is simply a health check for your website. It looks at technical issues, content quality, and how search engines see your pages. Once you know what’s wrong, you can fix it step by step and watch your traffic improve.
If you want to understand the full purpose behind this process first, read our guide on what an SEO audit is and why it’s needed before starting these 14 steps.
What Is an Onsite SEO Audit?
An onsite SEO audit is a full review of your website that checks everything search engines and visitors care about. This includes your site’s technical health, page speed, content quality, and internal links.
The goal is simple. Find what’s broken or missing, then fix it so your pages can rank higher and bring in more visitors.
A good audit covers these main areas:
- Crawlability. Can search engines find and read your pages?
- Speed and usability. Do pages load fast and work well on phones?
- Content quality. Is your content helpful and well organized?
- Links. Are your internal links connecting pages the right way?
Think of an SEO audit as a doctor’s checkup for your website. You look at every part, note what needs attention, and treat the problems one at a time.
Step 1: Crawl Your Website and Fix Technical Errors
Crawling your website means using a tool to scan every page, the same way Google does. This step finds technical problems that are easy to miss when you’re just browsing your own site.
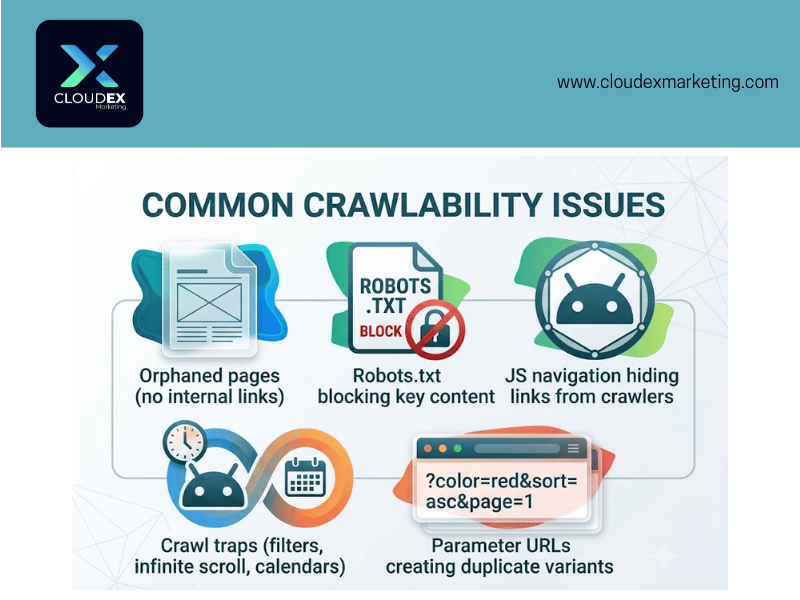
Search engines use bots to crawl websites. These bots follow links from page to page, reading content and deciding what to show in search results. If a bot can’t reach a page or gets confused by errors, that page may not show up in search results at all.
How to crawl your website:
Use a crawling tool like Screaming Frog. It’s free for smaller sites and paid for larger ones. Enter your website’s URL, and the tool will scan every page it can find.
Once the crawl finishes, look for these common problems:
- Duplicate content. Two or more pages with the same or very similar content.
- Broken links. Links that point to pages that no longer exist.
- Missing pages. Pages that return an error instead of loading properly.
- Redirect chains. Pages that redirect to another page, which then redirects again.
Why this matters:
If search engines run into too many errors, they may crawl your site less or skip pages entirely. Fixing these issues helps every other page on your site get found and ranked properly.
A common WordPress issue:
WordPress creates category pages automatically. These pages can end up looking like duplicate content if you’re not careful. If you use the Yoast SEO plugin, you can hide category pages from search results by going to SEO, then Search Appearance, then Taxonomies, and turning off the setting that shows categories in search results.
Duplicate versions of your site:
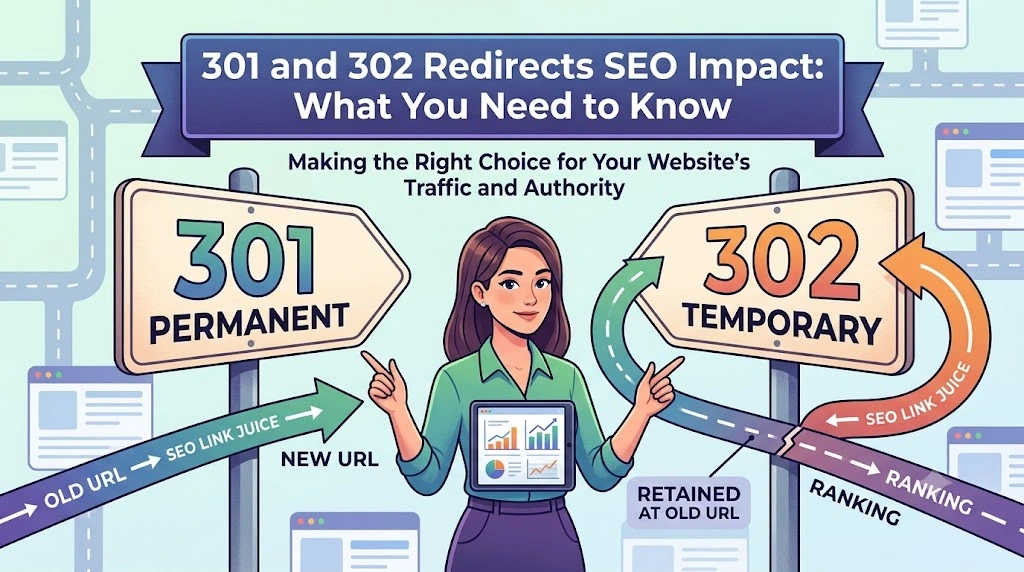
Your website might be accessible through several different addresses, such as with or without “www,” or with “http” instead of “https.” Search engines can see these as separate websites unless you fix it. The solution is a 301 redirect, which points all versions to one single, correct address.
If diagnosing and fixing these technical errors feels overwhelming, this is exactly the kind of work covered under our technical SEO services, where our SEO specialist handles the crawl, finds the errors, and fixes them for you.
Step 2: Remove Excess and Low-Quality Content
Not every page on your website needs to stay indexed. Some pages add little value and can actually hold back the rest of your site.
This process is called content pruning. It means reviewing your existing pages and removing, updating, or hiding the ones that aren’t helping anyone.
How to find pages worth removing:
Start by checking how many pages Google has indexed for your site. You can do this by typing site:yourwebsite.com into Google’s search bar. This shows every page Google currently has in its index.
Next, check your website traffic data. Look for pages that get little to no visitors over several months. These are your candidates for removal, updating, or blocking from search results.
What to do with underperforming pages:
- Refresh them. If the topic still matters, update the content with better information.
- Combine them. If two thin pages cover similar topics, merge them into one stronger page.
- Remove them. If a page serves no purpose, delete it and set up a redirect if needed.
- No-index them. If you need to keep a page for users but don’t want it in search results, add a noindex tag.
Why this step matters:
A website full of thin, low-value pages can dilute the overall quality signal search engines see for your entire domain. Removing weak pages helps your remaining strong pages rank better.
Step 3: Review Robots.txt and Robots Meta Tags
Your robots.txt file tells search engines which parts of your website they’re allowed to crawl. Getting this file wrong can accidentally block search engines from reading your entire site.
What robots.txt does:
This is a simple text file that sits at the root of your website. It gives instructions like “don’t crawl this folder” or “you can crawl everything.” If a mistake tells search engines to avoid your whole site, your pages can disappear from search results, sometimes very quickly.
How to check your robots.txt file:
Visit your website and add /robots.txt to the end of the address. This shows you the current file and its rules. Make sure nothing important is being blocked by accident.
Using meta robots tags:
While robots.txt controls crawling at a folder or site level, meta robots tags work on individual pages. Adding a “noindex” tag to a specific page tells search engines not to show that page in results, even if they’re allowed to crawl it.
This gives you more precise control. For example, you might want search engines to crawl a page (to follow its links) but not show it in search results.
A word of caution:
Because one small mistake in this file can block search engines from your entire site, always double-check changes before publishing them. It’s worth setting up a monitoring tool that alerts you if your robots.txt file changes unexpectedly.
Step 4: Check Your Page Speed and Load Times
Page speed affects both your rankings and how visitors feel about your website. A slow page frustrates visitors and can push them to leave before it even finishes loading.

How to check your page speed:
Free tools available online to check your page speed are:
- GTmetrix
- Pingdom Website Speed Test
- Google’s free PageSpeed Insights tool
- And more
Enter your page’s URL, and it will give you a score along with specific suggestions for improvement.
Common speed problems and fixes:
- Large images. Compress images before uploading, or use a plugin that does it automatically. As a general rule, keep individual image files under 100-200KB where possible, and never larger than 1MB unless the image is a large hero banner. Use modern formats like WebP instead of PNG or JPEG, since they offer the same visual quality at a smaller file size.
- Too many scripts. Remove unused plugins or scripts that slow down your page.
- No caching. Install a caching plugin so repeat visitors load your site faster.
- Slow hosting. If your hosting plan is outdated or overloaded, consider upgrading.
Why speed matters for SEO:
Google has confirmed that page speed is a ranking factor. Beyond rankings, speed directly affects whether visitors stay on your page or leave immediately, which also impacts your overall SEO performance.
Cleaning up your HTML:
Messy code can also slow your site down. A few simple steps help:
- Remove old, unused code from your pages.
- Minify your HTML, CSS, and JavaScript files, which simply means compressing them without changing how they work.
- Only load scripts and stylesheets that are actually needed on each page.
- Keep your page layout simple to avoid loading delays.
Step 5: Test Your Mobile-Friendliness
Mobile-friendliness is a website’s ability to display and function properly on smartphones and tablets, without zooming, horizontal scrolling, or misaligned elements, directly affecting both user experience and search rankings.
Most people now browse the internet on their phones. If your website doesn’t work well on mobile devices, it can hurt your rankings and drive visitors away.
Google folded mobile testing into Lighthouse, Chrome’s built-in auditing tool, and expects site owners to test manually using browser tools instead.
How to test mobile-friendliness manually:
1. Use your browser’s built-in device emulator.
Open your website in Chrome or Edge, then press F12 to open Developer Tools. Click the Toggle Device Toolbar icon (it looks like a small phone and tablet). This lets you preview your site at real device dimensions, like an iPhone 14/15 or a Samsung Galaxy, and interact with it as if you were on that device.
2. Check for horizontal scrolling.
Every layout element should fit within the screen width. If you find yourself scrolling sideways to see content, that’s a mobile usability problem that needs fixing.
3. Verify your text is readable without zooming.
Your base font size should be at least 16 pixels. Anything smaller usually forces visitors to pinch and zoom just to read a paragraph, which increases bounce rates.
4. Test your tap targets.
Buttons, links, and icons should be at least 48 by 48 pixels, with enough spacing around them. If two links sit too close together, visitors on a touchscreen will frequently tap the wrong one.
5. Check your menus and forms.
Navigation menus should collapse into a compact “hamburger” menu on smaller screens. Pop-ups and forms should never block the main content or make it impossible to close them on mobile.
Common mobile issues to watch for:
- Text too small to read without zooming
- Buttons or links placed too close together
- Content that doesn’t fit the screen width, causing horizontal scroll
- Pop-ups that block the main content on mobile
For a faster, automated check:
If manually testing every page feels slow, free tools like the SE Ranking Mobile Friendly Test or the SmallSEOTools Mobile Friendly Test can scan a URL and flag common mobile issues in seconds, a useful first pass before you dig into Developer Tools for the details.
How to fix mobile issues:
If you’re using an outdated website theme, updating to a newer, responsive theme usually solves most mobile problems automatically. If you’re not comfortable making these changes yourself, a developer can update your site’s theme and settings.
Once you’ve made changes, open your top pages on your own phone and check that everything looks and works correctly, and repeat the Developer Tools check for good measure.
Step 6: Elevate Your Core Web Vitals
Core Web Vitals are three specific measurements Google uses to judge how good the experience is on your web pages. Improving these numbers can help both your rankings and how visitors feel about your site.

The three Core Web Vitals are:
- Largest Contentful Paint (LCP). How long it takes for the main content of a page to load.
- Cumulative Layout Shift (CLS). How much the page layout moves around while it’s loading, like buttons jumping just as you try to click them.
- Interaction to Next Paint (INP). How quickly a page responds after a visitor clicks or taps something.
Where to check your Core Web Vitals:
Google Search Console has a dedicated Core Web Vitals report. It separates results for desktop and mobile and flags which pages have issues that need urgent attention.
How to improve your scores:
- Fix large, slow-loading images or videos to improve LCP.
- Set fixed sizes for images and ads so they don’t shift the page layout, improving CLS.
- Reduce heavy scripts that slow down how fast a page responds to clicks, improving INP.
Why this step matters:
Since these three metrics are now part of Google’s ranking system, ignoring them can hold back pages that are otherwise well written and well optimized.
Step 7: Get Rid of Structured Data Errors
Structured data is extra code added to your pages that helps search engines understand exactly what your content is about. Getting this right can help your pages show up with extra visual features in search results, like star ratings or event dates.
What structured data is used for:
Common examples include marking up product pages, reviews, recipes, and events. This code doesn’t change what visitors see on the page. It simply gives search engines more context behind the scenes.
How to check for structured data errors:
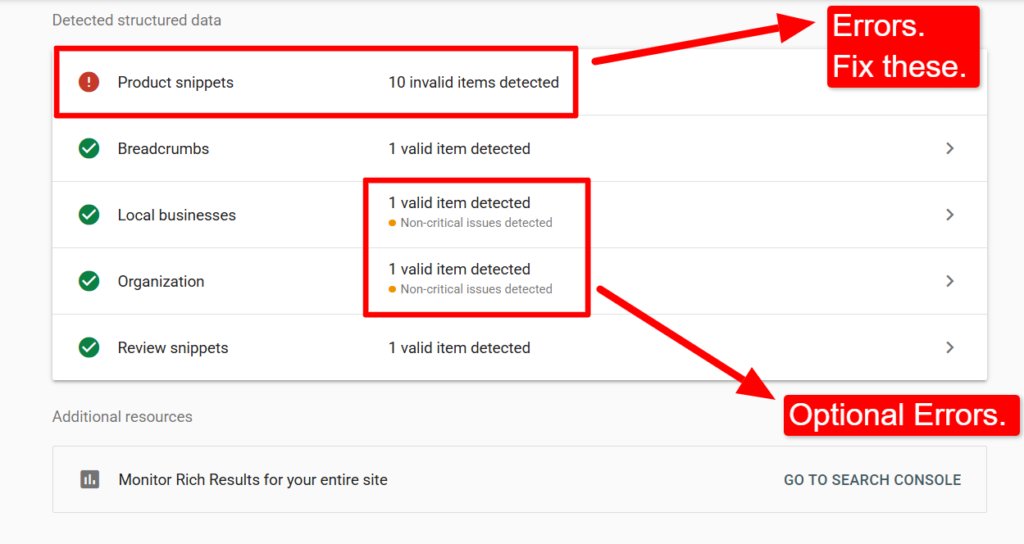
Use Google’s Rich Results Test tool. Enter your page’s URL, and it will show you what structured data it found, along with any errors.
What to do if you find errors:
If you built the site yourself, you can usually fix structured data errors directly in your website’s code or through a plugin. If a developer built your site, send them the error report so they can make the corrections.
Why this matters:
Even small errors in structured data can prevent your page from qualifying for enhanced search result features. Fixing these errors is usually quick, but the visibility benefit can be significant.
Step 8: Test and Rewrite Your Title Tags and Meta Descriptions
Title tags and meta descriptions are the text people see on Google’s search results page before they click. Well-written versions can directly increase how many people choose to click through to your website.
What a title tag does:
The title tag is the clickable headline shown in search results. It should clearly describe the page’s topic and include your main keyword naturally.
What a meta description does:
This is the summary text shown below the title tag. It doesn’t directly affect rankings, but a compelling description can convince more people to click on your result instead of a competitor’s.

How to check for problems:
Look for pages that share the same title tag or meta description. Duplicate versions confuse both search engines and visitors about which page is which. Use Screaming Frog (free) or SEMrush to check for duplicate meta titles and meta descriptions.
Basic guidelines to follow:
- Keep title tags around 55 to 60 characters so they don’t get cut off in search results.
- Keep meta descriptions around 130 to 150 characters.
- Include your main keyword naturally, without forcing it in awkwardly.
- Add emoticons to boost CTR or a freebie for gaining those clicks.
Testing over time:
After updating your title tags and descriptions, wait a couple of months, then check whether your click-through rate has improved. Keep refining based on what performs best.
Step 9: Analyze Keywords and Organic Traffic
Understanding which keywords already bring visitors to your site helps you know where to focus your efforts next. It also reveals patterns you can use to find more opportunities.
Why long-tail keywords matter:
Shorter, single-word keywords are extremely competitive. Longer, more specific phrases are usually easier to rank for and bring visitors who are further along in deciding to buy or take action.
How to check your organic traffic:
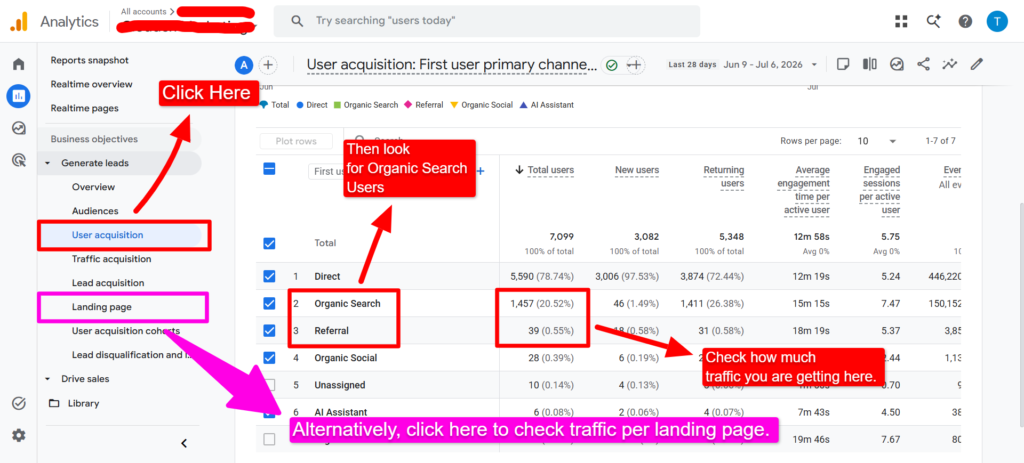
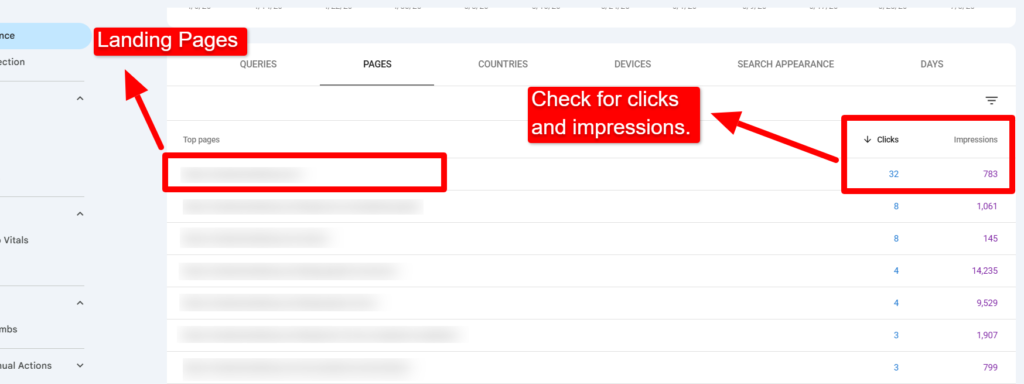
If you have Google Analytics connected with Search Console, you can view which landing pages bring in the most organic visitors. From there, cross-reference this with the search queries report in Search Console to see which searches are driving that traffic.
Questions to ask yourself:
- Which keywords bring in the most visitors right now?
- Which of those visitors actually take action, like making a purchase or filling out a form?
- Are there related keywords you haven’t targeted yet that could bring similar results?
Finding new keyword opportunities:
Once you know what’s already working, look for closely related keywords using a keyword research tool, like Semrush, Ahrefs, and Google Keyword Planner. These related terms make great topics for new pages or updates to existing ones.
Step 10: Learn From Your Competition
Studying your competitors is one of the fastest ways to find keyword opportunities you might otherwise miss. If they’re ranking for something valuable, there’s a good chance you can too.
How to find your organic competitors:
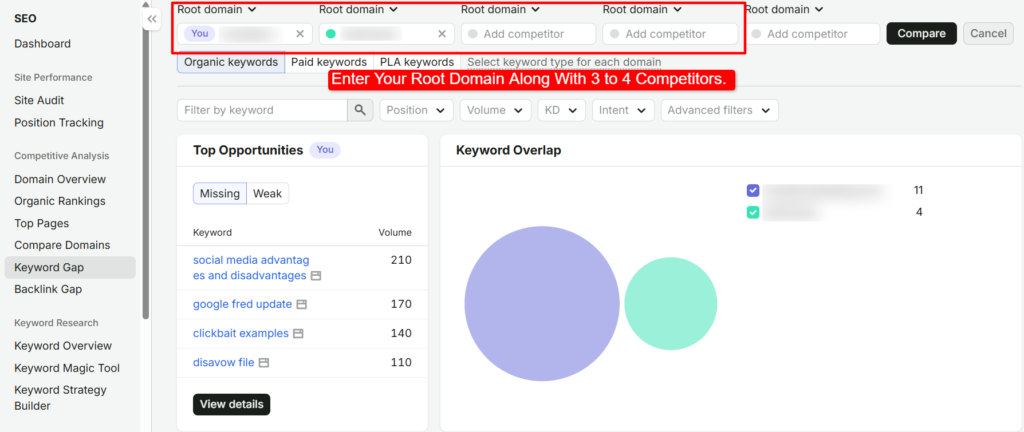
Most SEO tools, like Moz Competitive Research, Semrush Website Competitor Analysis Tool, and more, let you enter your website and instantly see a list of other sites competing for the same keywords. This gives you a clear starting point for comparison.
Alternatively, you can enter your seed keyword into your preferred search engine and find your top 3 competitors (Top 3 are enough but you can find more).
What to look for:
- Keywords your competitors rank for that you don’t target at all.
- Topics where their content is more thorough than yours.
- Pages of theirs that get lots of backlinks or search visibility.
Turning competitor research into content ideas:
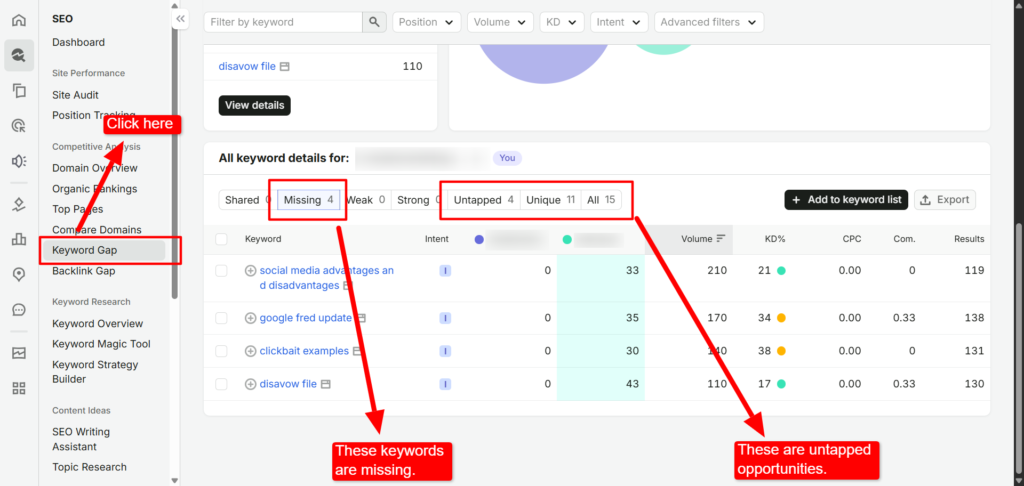
Once you know which keywords your competitors rank for, but you don’t, these become a natural content calendar. Prioritize the ones most relevant to your business and audience first.
Tip:
Use SEMrush keyword gap to identify the keywords that you haven’t tapped yet along with weak keyword opportunities. Check how many backlinks the page is getting and decide if you can outrank the competitor based on the data.
Step 11: Improve Content With an On-Page SEO Audit
Search engines consistently reward content that’s clear, well organized, and genuinely helpful to readers. This step reviews your existing content and improves what’s already there.
Small-scale improvements:
- Add clear subheadings (H2s and H3s) to break up long sections.
- Break large paragraphs into shorter ones for easier reading.
- Make sure each section answers a specific question clearly.
Larger-scale improvements:
Rather than adding random extra content, focus on making your page more complete. Look at what top-ranking competitor pages cover that yours doesn’t, and fill in those gaps with genuinely useful information.
Once you’ve made real content updates, don’t overlook the publish date sitting on the page. If you’re refreshing a page but leaving an old date untouched, or updating the date without actually changing the content, both send the wrong signal to readers and search engines. Our guide on why publish dates matter for your SEO elaborates this more clearly.
What to avoid:
Adding unrelated or filler information just to make a page longer usually backfires. It dilutes your main point and makes the page less clear for readers. Every addition should serve a real purpose.
Tip:
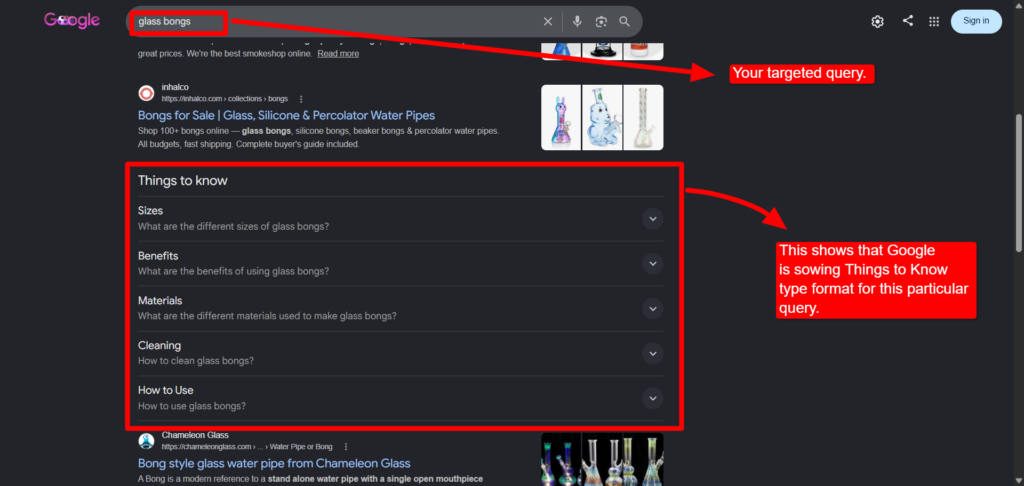
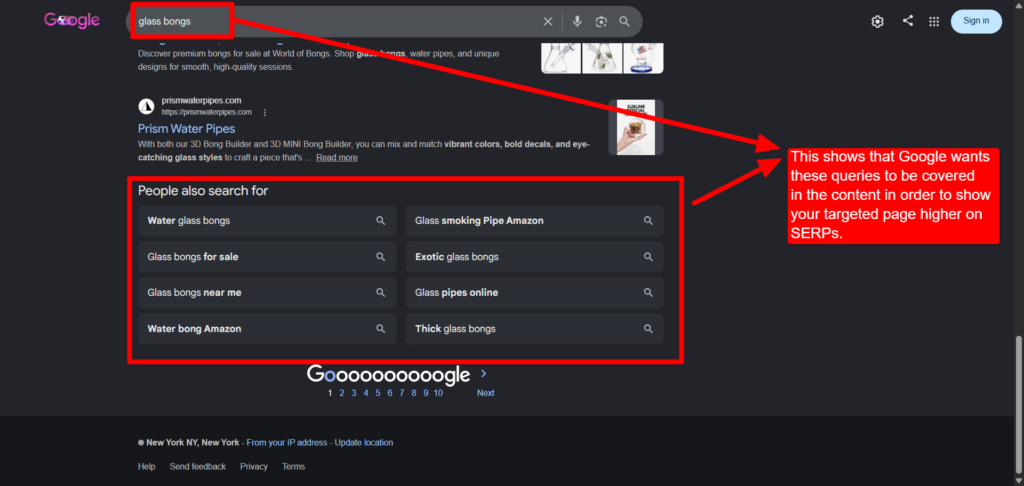
Always check search consensus before writing content. Enter your keyword into Google or your preferred search engine to check how Google is displaying data (either tables, listicles, or even in video format), check AI overviews, which entities are being listed, and check how Google wants you to write content. Then make sure you write the content in the same format as Google wants you to.
A simple content checklist:
- Is the content written for humans first, not just search engines?
- Is it broken into short, easy-to-read sections?
- Does it fully answer the reader’s question?
- Are there too many ads interrupting the reading experience?
- Is it free of spelling and grammar mistakes?
Optimizing for featured snippets and AI overviews:
To increase your chances of appearing in these prominent search features, structure your content with clear headers and provide direct, concise answers early in each section. It improves the responsiveness of your content.
Step 12: Optimize Your Existing Internal Links
Internal links connect your own pages. They’re overlooked, but they give you direct control over how both visitors and search engines move through your site.
Why internal links matter:
They help search engines understand which pages on your site are most important. They also help visitors discover related content, keeping them on your site longer.
How to check your current internal links:
Google Search Console has a Links report that shows how many internal links point to each of your pages. Pages with very few internal links may be harder for both search engines and visitors to find.
How to structure your internal links:
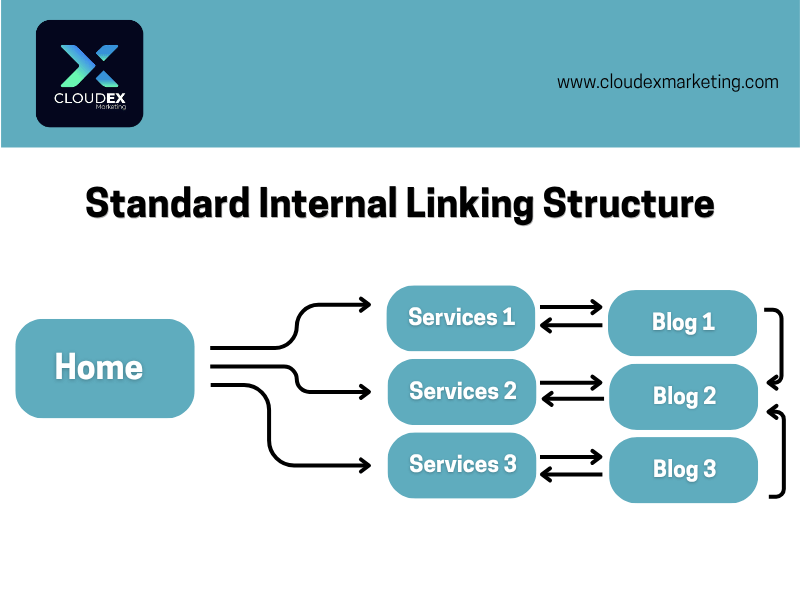
Think of your website like a pyramid. Your homepage sits at the top. Below that are your main category pages. Below those are individual pages that belong to each category.
Link related pages to each other where it makes sense, and make sure lower-level pages link back up to their main category or cornerstone page.
Anchor text matters:
Instead of using generic text like “click here,” use descriptive anchor text that tells both readers and search engines what the linked page is about. For example, link to “our complete guide to chocolate chip cookie recipes” rather than just “click here.”
A simple ongoing habit:
Every time you publish new content, look for opportunities to link it to relevant existing pages, and update those older pages to link back to the new one.
Step 13: Reformat URLs and 301 Redirects
Your URLs, the web addresses of each page, play a role in both search engine understanding and user trust. This step reviews your current URLs and makes sure redirects are set up correctly.
Good URL practices:
- Keep URLs short and easy to read.
- Avoid unnecessary numbers, symbols, or session IDs.
- Include your target keyword where it fits naturally.
- Use words instead of random characters so both people and search engines understand the page’s topic at a glance.
When to avoid changing URLs:
If a page already has good rankings and external links pointing to it, changing its URL can temporarily hurt its performance. Only change URLs when they’re genuinely poor, and always set up a proper redirect afterward.
Setting up 301 redirects:
A 301 redirect tells both browsers and search engines that a page has permanently moved to a new address. Make sure every changed URL redirects to its correct final destination, and avoid chains where one redirect leads to another redirect.
A quick checklist:
- Are all redirects using the 301 (permanent) type, not temporary redirects?
- Does each redirect point directly to its final destination?
- Are there any broken redirects left over from old website changes?
Step 14: Track Your Site Audit Results
Making changes without tracking their impact means you’re guessing instead of knowing what’s working. This final step turns your audit into an ongoing, measurable process.
Why tracking matters:
If you don’t measure results after making changes, you won’t know which fixes actually helped and which ones didn’t matter. Tracking turns your SEO work into a repeatable, improvable process instead of a one-time guess.
What to track:
- Keyword rankings for your most important pages.
- Organic traffic to each page over time.
- Click-through rates from search results.
- Conversion rates from your top-performing pages.
Setting up tracking:
Connect Google Analytics and Google Search Console if you haven’t already. Together, they give you a clear picture of both traffic and search performance. Many SEO platforms also offer rank tracking dashboards that show daily or weekly changes for your target keywords.
Reviewing your progress:
Set a regular schedule, such as monthly, to review your tracking data. Note what’s improved, what’s stayed flat, and what might need a different approach.
Why You Should Audit Your Top Pages First
Not every page on your website carries equal value. Your top pages, the ones already driving the most traffic and conversions, deserve the most attention during an audit.
Finding hidden technical issues:
Focusing on your top pages first helps you catch problems that are actively costing you traffic or conversions right now, rather than spending time on pages nobody visits.
Improving what already works:
Small improvements to a page that already gets solid traffic produce better results than the same effort spent on a page that gets almost none.
Comparing against competitors:
Reviewing how your top pages compare to top-ranking competitor pages shows you exactly where to improve, rather than guessing.
Using your time and budget wisely:
Since not all pages matter equally to your business, concentrating your effort on the highest-value pages ensures you get the best possible return on the time you spend.
Common Mistakes to Avoid During an SEO Audit
Beginners get lost chasing small details while missing bigger structural problems. Here are 4 mistakes worth avoiding.
1. Obsessing over minor details too early:
Things like exact keyword density or perfect image file names matter far less than fixing crawl errors, broken links, or slow page speed. Start with the fundamentals before fine-tuning small details.
2. Changing URLs unnecessarily:
If a page is already ranking well, don’t change its URL just to include a keyword. The temporary drop in rankings isn’t worth the small benefit.
3. Ignoring mobile experience:
Since most searches happen on mobile devices, any audit that skips mobile testing is incomplete.
4. Never revisiting the audit:
An SEO audit isn’t a one-time task. Websites change, content ages, and new technical issues appear over time. Running this checklist regularly keeps your site healthy long-term.
How Often Should You Run an SEO Audit?
There’s no single fixed rule, but running a full audit every few months helps you catch problems early, before they cause serious damage to your traffic or rankings.
Smaller checks, like reviewing page speed or broken links, can be done more frequently, even monthly, especially for larger websites that add new content.
Doing This Yourself vs. Hiring Help
Everything covered in these 14 steps can be done on your own with free or low-cost tools. It takes time, patience, and a willingness to learn a few new tools along the way.
If you’d rather not handle this process alone, many businesses choose to compare different agencies before deciding who to work with. You can see how various providers approach this work by reviewing comparisons of top SEO companies to understand what a professional audit typically includes and how pricing usually works.
For businesses wanting professional help without a large budget, our $99 SEO service covers core audit and optimization work at an accessible starting price, making it a practical option if you want expert eyes on your site without committing to a full enterprise-level retainer right away.
Final Thoughts
Running through these 14 steps gives you a complete picture of your website’s health, from technical crawlability all the way through to tracking your results over time. None of these steps require advanced technical skill. They just require patience and a willingness to check each part of your site carefully.
Start with your most important pages, work through each step methodically, and track what changes actually help. Over time, this simple, repeatable process builds a website that both search engines and visitors trust.
If at any point the technical side feels like more than you want to handle alone, professional technical SEO services can take over the more complex parts of this checklist while you focus on running your business.